
I built a simple ComfyUI Subgraph that does one thing really well. It keeps a shot running and lets you push the length as far as you want. No looping. No weird morphs. Mid-clip you can change the motion with a single line, and it stays clean. I run a Q5 GGUF model, so even a low-VRAM PC can handle it.

The short version
- Unlimited length by stacking parts. Each part is a Subgraph block.
- Clean cutover. Change motion halfway with one line, no jitter.
- Low VRAM friendly. Use WAN 2.2 GGUF Q5.
- Fixed cadence. 81 frames at 16 fps for every part.
- Three samplers per part. 1 step without LoRA, then 3 and 3 with LoRA.
- Per-part seeds. If only Part 4 looks off, randomize only that seed and re-run that block. Others stay exact.
What changed for me
Earlier my graph was massive. Making a 40-second clip meant new groups with a pile of nodes. Subgraph fixed that. I packed each chunk as a clean block. Now I just duplicate a Part, hook it up, and move on.
Files you need
For WAN 2.2 unlimited video workflow
Put these files in the right ComfyUI folders.
1. High-Noise GGUF model
Wan2.2-I2V-A14B-HighNoise-Q5_K_M.gguf
Folder: ComfyUI/models/diffusion_folder
(you load it with the UNET GGUF Loader node)
2. Low-Noise GGUF model
Wan2.2-I2V-A14B-LowNoise-Q5_K_M.gguf
Folder: ComfyUI/models/diffusion_folder
3. LoRA for Low Noise
wan2.2_i2v_lightx2v_4steps_lora_v1_low_noise.safetensors
Folder: ComfyUI/models/loras
4. LoRA for High Noise
wan2.2_i2v_lightx2v_4steps_lora_v1_high_noise.safetensors
Folder: ComfyUI/models/loras
Optional. stronger motion LoRA
PUSA WAN 2.2 V1 for 4-step motion
Folder: ComfyUI/models/loras
Use later if you want more motion. Keep it bypassed at first.
Setup that works on a Loe VRAM CPU
- Load it in ComfyUI and upload one source image.
- Pick models inside each Part group
- High-Noise WAN model
- Low-Noise WAN 2.2 model in GGUF Q5
- Text encoder
- VAE
- Two LoRA slots are there. They are bypassed by default. Add motion LoRA later if you want extra movement.
- GGUF Q5 keeps memory in check while holding quality. It is a common sweet spot for low VRAM systems.
- Choose a safe resolution with Resolution Master
- Preset WAN
- Start at 720×720
- Autofit on
- If 1024×1024 get an allocation error, stay at 720×720. Heavy source images might need sizes like 624×832.
- Set these two things once and do not change them
- Frames: 81
- FPS: 16
- Sampler steps
- Sampler 1 without LoRA: 1 step
- Sampler 2 with LoRA: 3 steps
- Sampler 3 with LoRA: 3 steps
- You can push the first one to 2 or 3 if your scene needs more stability. Same for the others if you want a little extra detail.
- Seeds
- Keep seeds Fixed for Parts that look right
- Set only the broken Part to Random and re-run just that group
Prompts that keep motion steady
Video 1 Prompt
Winter village. Soft snow. Camera shows the boy from head to boots. He smiles. He holds a small axe and points it.
Video 2 Prompt
He starts running. Small puffs of snow. Axe down by his side. Cozy houses pass in the background.
Video 3 Prompt
He runs faster. Gentle camera move for a cinematic feel.
Video 4 Prompt
A small wooden stump appears and he sets the axe on the stump safely.
The handoff between parts is smooth because the timing and steps stay the same. I just change one line for the new motion.
How to extend to unlimited time
- Copy the whole Part group.
- Connect the matching hooks
Setup to Setup
No-LoRA to No-LoRA
Width to Width
Height to Height
Num Frames to Num Frames
First Image to Start Image
Video to Video - Add the new Part to Combine Video.
- Copy the Global Seed if you want the same look, or switch it to Random.
- Add one line to the prompt for the new beat. For example he picks up the axe and walks again. Run it.
- As clips get very long in a single pass you might see small color drift. I keep one run to about 20 to 25 seconds, then add more Parts in the next pass.
Second test that taught me a quick fix
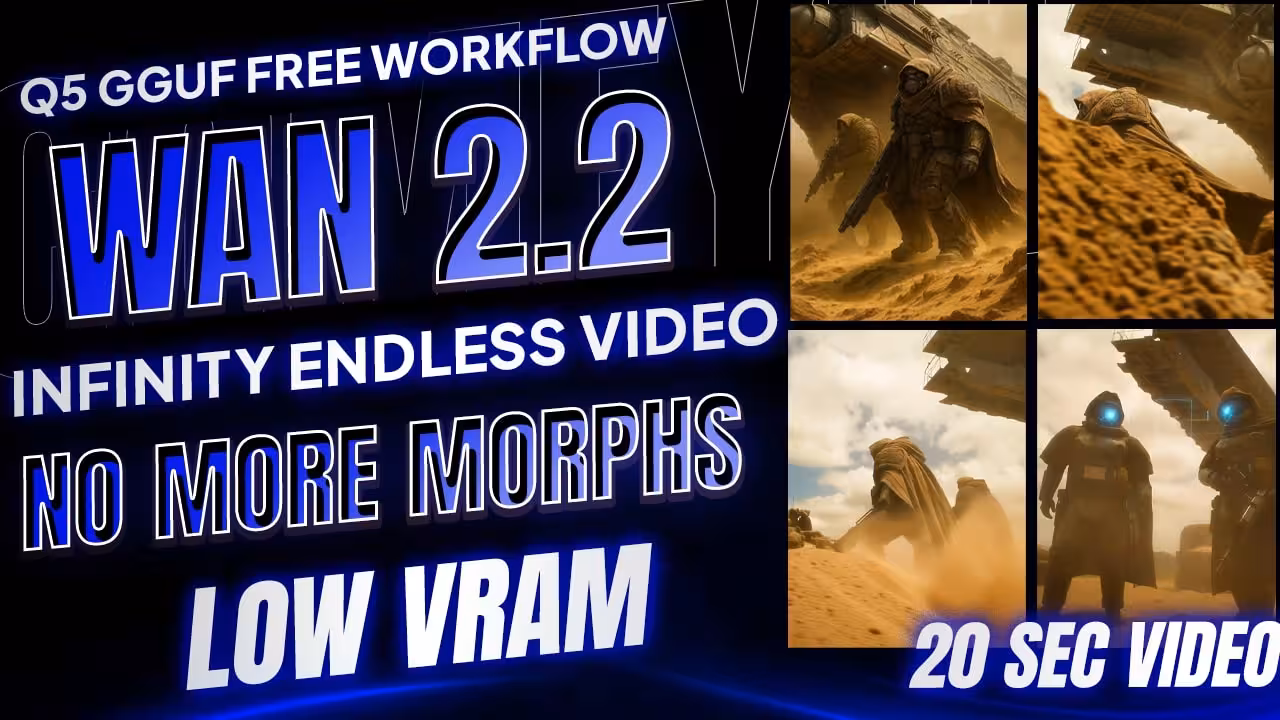
Scene was a sci-fi desert with two soldiers. My source image was 1176×1164 and blew RAM on my card. I dropped to a safe size. First tried 720×1080, then 624×832 to be extra safe. Kept steps at 1, 3, 3. Wrote short action lines and a small camera move in each Part. Looked cinematic. Only Part 4 felt off, so I changed its prompt and seed. Re-ran only that Part. Done.
FAQ
Can I really keep adding Parts forever
Yes. You can stack Parts to any length. Keep the same 81-frame cadence and connect the hooks correctly. If drift shows up after a long run, extend in new passes with fresh Parts.
Why Q5 GGUF
Lower memory, decent quality. On small GPUs and even CPU-heavy runs, Q5 is a practical choice. Try other quants if your hardware is different.
Do I need both High-Noise and Low-Noise models
For this workflow, yes. That pairing keeps the denoise path consistent across Parts.


Great job as always…. waiting for your video about wan2.2
Thanks for a great tutorial on a very promising tech for me.
will this run on 6GB vram?
Excellent! Thanks for sharing this. What GPU do you use? How long does it take to generate each video? I’m thinking of using a 4090. For this workflow, could you give me an average generation time?
All the 4 units “Video Part 1 to 4” Subgraphs and “Combine all video” are in RED, and keep getting: Missing Node Types When loading the graph, the following node types were not found – using 0.3.59 – sent an email with screenshot.
Some nodes require a newer version of ComfyUI (current: 0.3.59). Please update to use all nodes.
Requires ComfyUI 0.3.58:
30f6a74d-ad45-4a46-9d83-3a431f4fa3ff, 4b216bc4-9594-4c6a-885f-8e23c33f63fc, 6220380c-a2c8-4377-ba5c-7b8693d0d60f, f97619eb-f5c1-4814-869c-0bf224843014
Requires ComfyUI 0.3.50:
134466b7-829e-46ea-9585-eaa7bc416c3a
Free Download – Verify your email once, then just enter it to get any workflow instantly in 1 click! Dont work!
Thank you Sister!
Thank you for your grate job, is truly amazing what you did. One question the motion of my generations is to fast, I use the wan2.2_i2v_high/low_noise_14B_fp8_scaled model and I removed sage attention since I am using Linux, my graphics card is a 5090, in fact the speed of movement increases from one generation to the next, in forth stage is like the characters are having a seizure :-), any tip is welcome, Thank you again
Oh, an email came with the real link.
So where is the link to actually download the comfy workflow json file? None of your posts seem to share the actual workflow needed.
where is the workfflow
Link not working tried hotmail email as specified (why does it only accepts hotmail, gmail, and yahoo? – what year are we in!!) never received link. Moving on..
You suggested this really well!
i tried to run your workflow, but the node, resolution master in which the variables were not shown. I don;t know how to manipulate because I cannot change the setting. If the variables settings inside. have no influence of the workflow, I would like to test how and what the result would be after completion of the workflow.
Kindly please let me know if i can go on with the workflow. Anyhow, I want to fix the node to have all the variable visible in the last resort.
Thank you for your prompt advice.
Rgds,
There a some missing nodes that can’t be installed with comfyui (thru comfyui).
Hello. I could not verify my email. I would like to have the workflow json. Is there any other way to obtain it?
cant download. Submission endpoint missing.
Submission endpoint missing.
For some reason the parts are not stitched together in the long video, each segment is created under a folder called swap. Any idea?
You have the wrong model links compared to your workflow; you use Wan2.2-I2V-A14B-HighNoise-Q5_K_S.gguf but your listing Wan2.2-I2V-A14B-HighNoise-Q5_K_M.gguf, same for the LowNoise
Great ! Thank you so much for your workflow and your advices.
But, I would ask you if it’s normal for a laptop with RTX5080 (16GB VRAM) and 96 GB RAM, creating your video example (the kid with the axe: 720×720 pixels) in nearly 2 hours and a half.
Can you send me your opinion and advices since I think it’s a too long time…
I would use your workflow but, if it’s so slow, it becomes useless (20 sec of video in 7500 sec of running time).
Thanks a lot for any kind of help you’ll help me.
I look forward to readng your suggestons. Thank you !
Why not link the workflow the same as any other file you link?
great job, thks
struggling with downloading workflow, registered email but getting message security check fail
Clear your cache, or refresh the page
Can’t download the workflow, it says security error..
Clear your cache, or refresh the page
Same BS a Osar was suffering!
Can’t download workflow!!
Says log_in I AM LOGGED IN!”!!!!!!!!!!!!!!!!!!!!!!!!!!!!!!!!!!!!!!!!!!!!!!!!!!!!!!!!!!!!!!!!!!!!!!!!!!!!!!!!!!!!!!!!!!!!!!!!!!!!!!!!!
Clear your cache, or refresh the page