


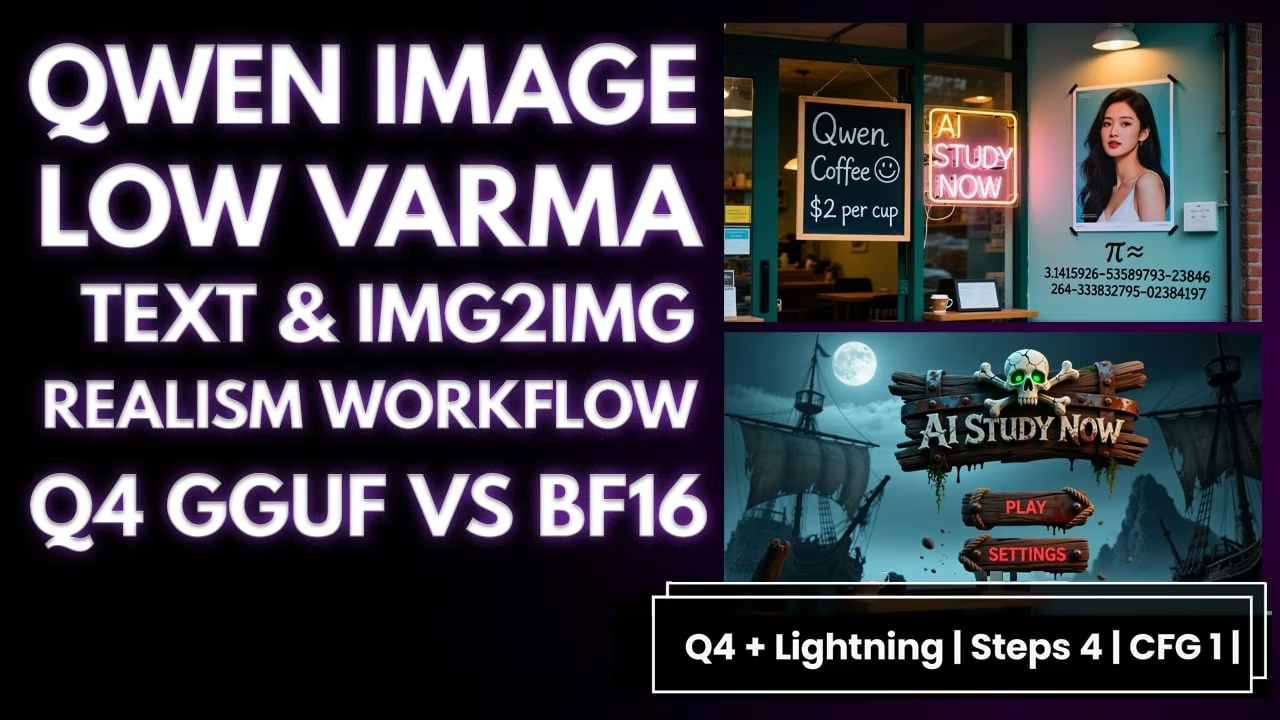
Run Qwen Image on low VRAM with GGUF. Lightning 4 and 8 steps, plus a small realism LoRA. Same seed. Same scene. Clear settings you can copy.
I keep this simple. First I explain what changed. Then I show what to download, where to place the files, and how to set the graph. After that I run the tests: baseline FP16, 8 steps, 4 steps, and a low VRAM Q4 pass. I also try the realism LoRA, a product shot, a game UI, and a quick image to image polish. If you want a quick primer on my ComfyUI flow, I have an older Qwen post you can skim on my site. You can also grab ComfyUI from GitHub and the model cards on Hugging Face if you are starting fresh.
What changed in this run
LightX2V shipped Lightning LoRAs for Qwen Image. The goal is speed while keeping text and layout stable.

What you need for the Qwen Image GGUF Low VRAM Comfyui Workflow
Pick one Lightning LoRA. Only one should be active.
Optional realism add on:
Place LoRAs here, then restart ComfyUI:ComfyUI/models/loras/
Base model
Use the quant that fits your GPU and RAM. Smaller Q runs faster but softens a bit. I tested Q8 and Q6. Speed was almost the same. Q6 was only 1 to 2 seconds faster and the quality looked very close. A friend ran Q4 on a 12 GB card and it was fine.
ou can grab the GGUF From Here variants
Place the base here, then restart:ComfyUI/models/diffusion_models/
[UPDATE: GGUF model files also go in ComfyUI/models/diffusion_models/. Use the GGUF UNet Loader in the graph and skip the full diffusion checkpoint.]
Encoders and VAE
Set the Workflow once
I lock the seed. I let the output follow the image size unless I say to rescale.
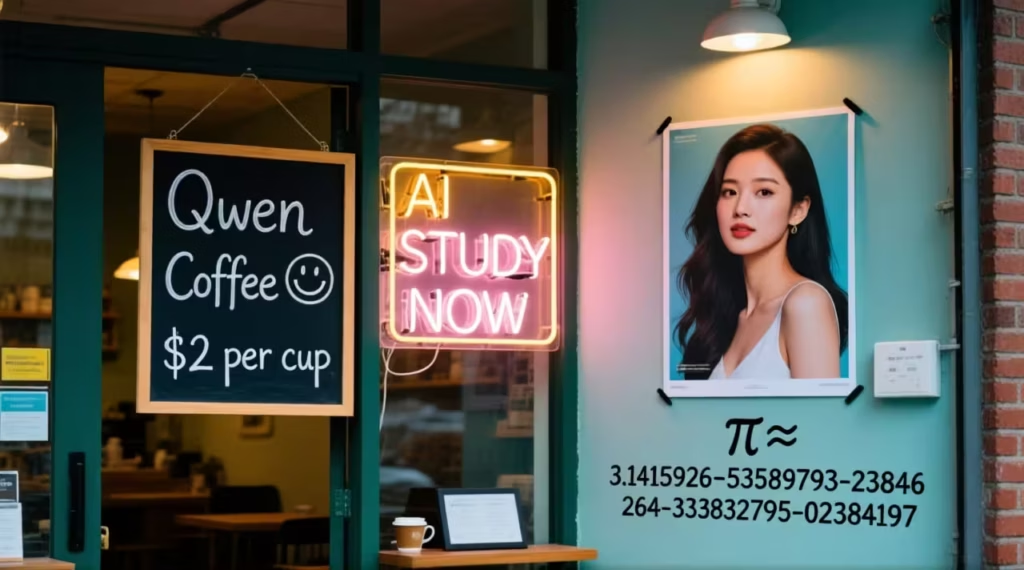
Baseline (FP16, no LoRA)
Model: full FP16
Steps / CFG: 20 / 4
Size: 1280×713
Prompt:
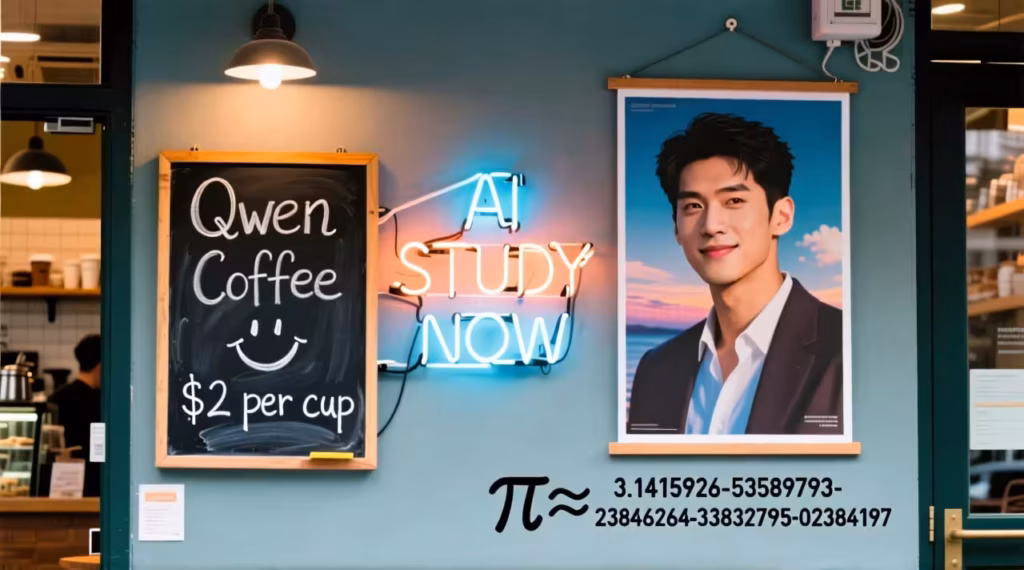
A coffee shop entrance features a chalkboard sign reading “Qwen Coffee 😊 $2 per cup,” with a neon light beside it displaying “AI STUDY NOW”. Next to it hangs a poster showing a beautiful woman, and beneath the poster is written “π≈3.1415926-53589793-23846264-33832795-02384197”.
I hit Generate. 1 minute 26 seconds.
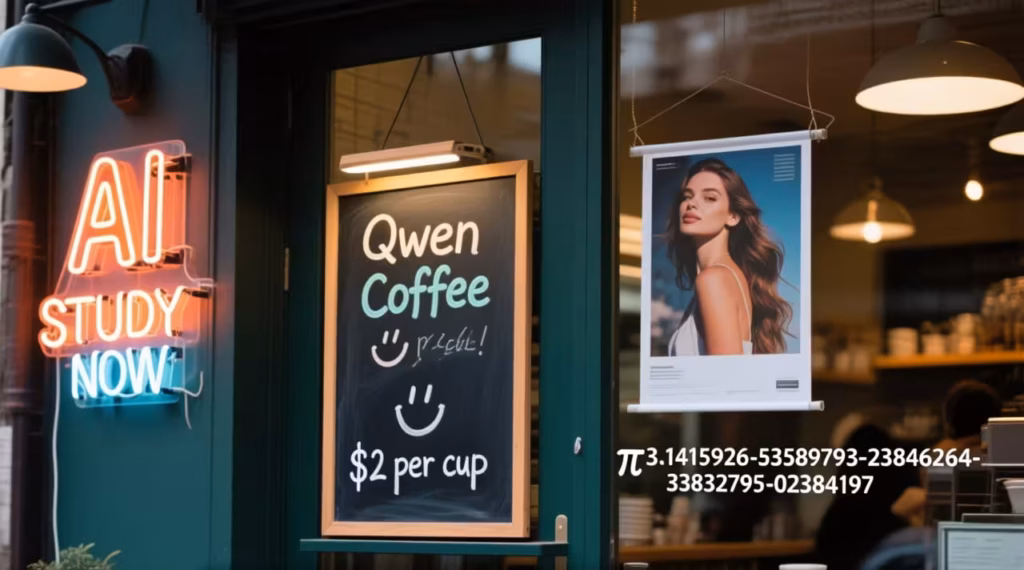
The board says Qwen Coffee. “$2 per cup” is clean. The smiley sits near the price. The neon reads AI STUDY NOW on the left. The poster is sharp. The long pi line is readable. This is the baseline.
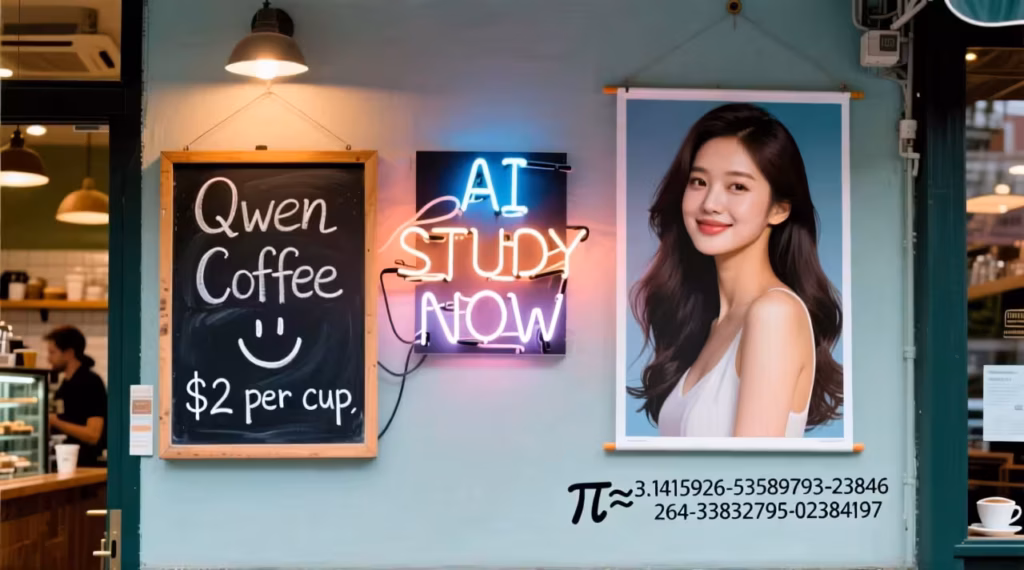
Lightning 8 step
LoRA: LightX 8 step
Steps / CFG: 8 / 1
Size: 1280×713
Same prompt. 18 seconds.
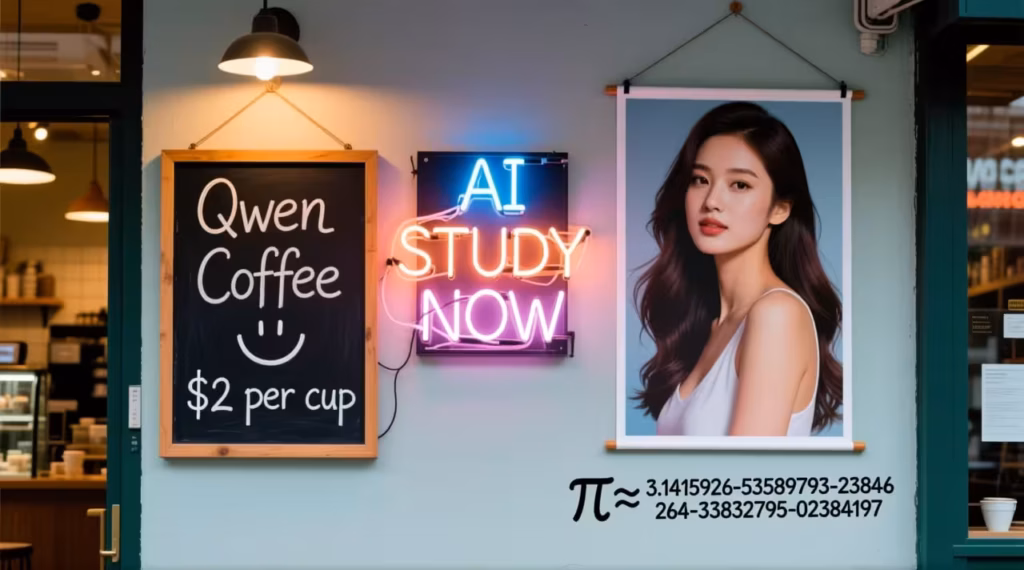
Board still reads Qwen Coffee with the smiley. “$2 per cup” is clear. The neon says AI STUDY NOW. The poster stays clean. The long pi line is complete. On close zoom the thinnest chalk edges are a little softer than FP16. The scene and layout match.
Lightning 4 step
LoRA: LightX 4 step
Steps / CFG: 4 / 1
Size: 1280×713
Same prompt. 8 seconds.
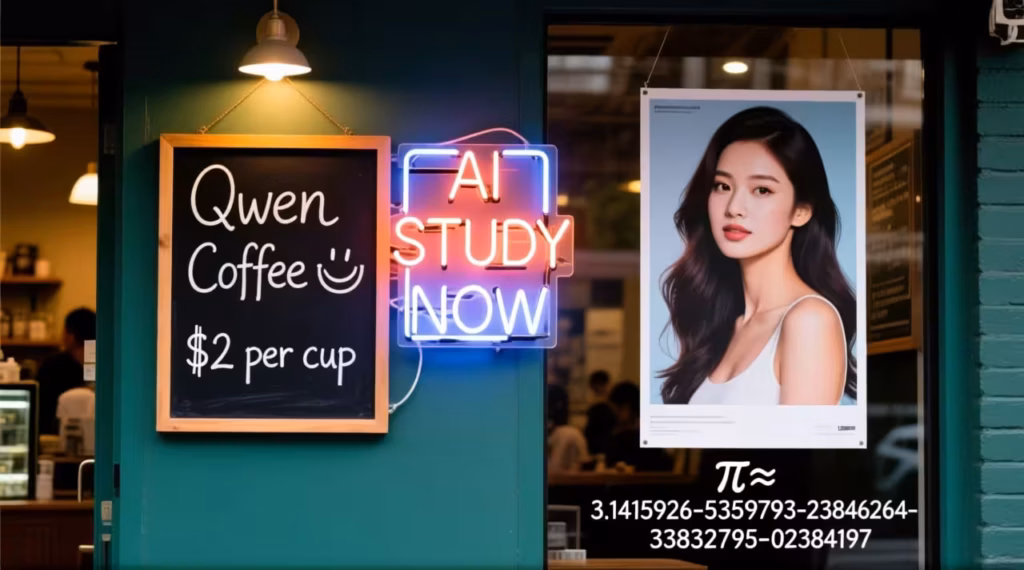
Qwen Coffee is readable. “$2 per cup” is clean. The smiley lands in the right spot. The neon glow looks good. The poster is sharp with natural skin tone. The long pi line stays clean and grouped the same way.
Low VRAM preset
Base: Q4
LoRA: 4 step
Steps / CFG: 4 / 1
Size: 1280×713
Same prompt. 8 seconds. No memory issues.
The board says Qwen Coffee with the smiley. “$2 per cup” is clear. The neon reads AI STUDY NOW. The poster is sharp. The long pi line shows up. Fine chalk texture is a bit softer than FP16, but most people will not notice.
Quick line to keep: for text on low VRAM, Q4 with 4 step works well.
Realism test
Model: BF16
LoRA: flymy_realism.safetensors
Steps / CFG: 50 / 5
I add the word “Realism” at the start of the prompt.
I hit Generate.

Skin and light feel natural. Beard edges are clear. The coat looks matte. A white earbud is visible. The café detail fits, and “AI STUDY NOW” is readable on glass. Depth feels right. Face sharp. Background softer.
I run the same prompt without the realism LoRA. It is good. With realism on at 50 and 5 it looks better. I also tried Lightning with realism. At 4 steps the skin looks plastic. At 8 steps it looks better than 4, but still not as natural as realism at 50.
Low VRAM check
I switch the base to Q4.
Simple rule: for the best realism, use the realism LoRA alone at about 50 steps on Q8. No Lightning. It is slow. It is not a low VRAM trick.
Product shot
Base: Q4
LoRA: Lightning 4 step
Steps / CFG: 4 / 1
Size: 1920×1080
I hit Generate.
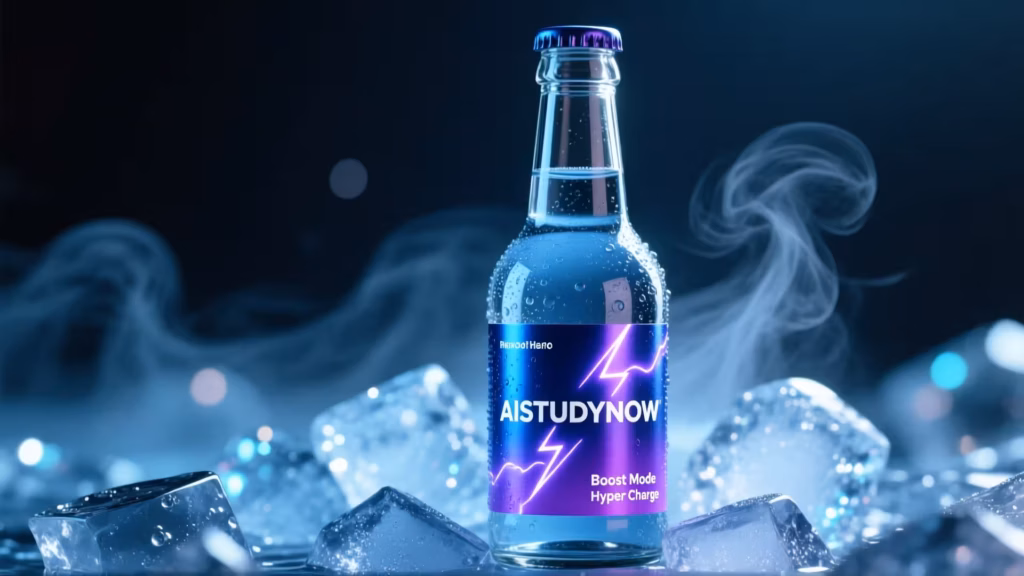
A long neck glass bottle with a pry off cap. A metallic label that shifts from deep blue to neon purple. AISTUDYNOW in big bold letters. A lightning graphic wraps the label. I can read Boost Mode and Hyper Charge. Heavy condensation on the glass. Ice at the base. Cool vapor in the air. Smooth bokeh behind it. It reads close to FP16, but runs light on VRAM.
Game UI
Base: Q4
LoRA: Lightning 4 step
Steps / CFG: 4 / 1
Size: 1920×1080
I hit Generate.
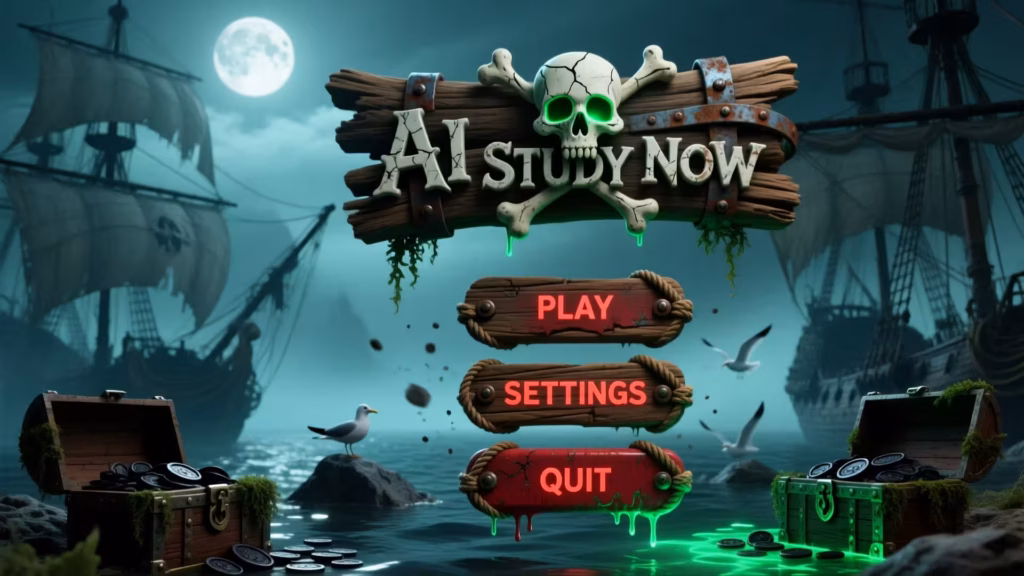
A driftwood logo with a skull and crossbones. A soft green eye glow. Three buttons in a vertical stack: PLAY, SETTINGS, QUIT. Rope and bits of seaweed on the wood. Light rust on the rivets. Distressed red letters with a small drip. Ash motes and a touch of sea mist. In the back, a moonlit bay with ships, rocks, and torn sails. The wood banner reads AI STUDY NOW and stays clear.
Quick image to image polish
Mode: Image to Image
Upload: your source in the Image Group
Empty Latent Size: bypassed
Prompt: short, usually the original prompt plus one small note
Denoise
Light polish: about 0.30 to 0.40. At 0.35 the layout holds. Textures sharpen. Small edges pop.
If denoise is below 0.30 you will barely see a change. If it is above 0.80 the scene can drift.
Bigger change: about 0.70. I add “poster shows a man”. Generate. The poster swaps to a man. The rest stays close.

