
I wasn’t planning to test anything new this week. Too many projects going on. But then Black Forest dropped something interesting — FLUX.1 Krea. Just a casual post, nothing flashy. But the moment I saw the sample image, I knew I had to stop everything.
It looked real. Like, actually real.
No glow, no plasticky blur, none of that over-smooth AI weirdness.
So I tested it. Compared FLUX.1 Krea to their previous model, Dev1. Same exact prompt. No LoRA. Just a raw generation with each.
Here’s what happened:
The Dev1 output still had that usual AI vibe. Too clean, too stylized. You could tell it was generated the moment you saw it.
But the FLUX.1 Krea result? Looked like a real photo. It wasn’t even close.
What really got me was how it handled reflections. There was a puddle on the ground, and you could clearly see the back door of the building mirrored in it — perspective correct, no weird warping. That’s something AI usually fumbles. But not here.
Even the water distortion looked real — like actual light bouncing off a surface. The highlight on the car’s hood and chrome? Dead-on accurate. The ground had subtle bits of random debris. Not uniform. Not smeared. Just… right.
And this detail: the tires. They weren’t perfectly clean. They had that slight wear you’d expect on a real vehicle. No plastic shine. Just realism.
So yeah, I was impressed.
But here’s the thing that really surprised me.
They didn’t build FLUX.1 the usual way. No giant datasets. No benchmark chasing.
Instead, they took a very human approach — and it actually worked better.

How FLUX.1 Krea Was Actually Trained (Not What You’d Expect)
Most models chase metrics — FID, CLIP score, benchmark scores like DPG or GenEval. But Krea and Black Forest didn’t do that.
They started with a goal: build something that doesn’t look AI.
No glossy skin. No blurry bokeh mush. Just images that feel real, balanced, and personal.
And to get there, they completely flipped the usual training script.
Pre-training: Mode Coverage > Perfection
The first stage was pre-training — and instead of aiming for polished results, they focused on diversity.
They wanted the model to understand the world — lighting, objects, angles, structure — even if the output wasn’t pretty. Basically, the model needed to see everything, including “bad” images. That way, it could be steered away from them later.
That’s what they mean by “mode coverage.” You teach the model the entire space — good and bad — so that later you can collapse it toward only the parts you want.
That base model is called flux-dev-raw. It’s a guidance-distilled 12B transformer diffusion model. And it’s raw on purpose — unbaked, no aesthetic filtering, no overfitting.
It’s not trying to be pretty. It’s trying to know everything.
Post-training: Collapse Toward Taste
Once they had that raw base, they started shaping it. This is where FLUX.1 really became FLUX.1.
They broke post-training into two parts:
1. Supervised Fine-Tuning (SFT)
They created a tight, high-quality dataset that matched their own taste. It wasn’t huge — under 1 million images. But every sample was picked with intent. Some were real, some synthetic (from earlier Krea 1 generations), and all of them leaned toward their aesthetic goals.
Because the model was guidance-distilled, they wrote a custom loss function to align it directly to classifier-free guidance (CFG) outputs. That helped keep the outputs stable while pushing style.
2. Human Feedback (RLHF via TPO)
Then they brought in people.
Using a preference comparison method called TPO (a variant of preference optimization), they had users compare image pairs and pick which looked better. This wasn’t just crowd votes — they curated the annotators too, making sure the feedback came from people who actually understood the model’s strengths and weaknesses.
They ran multiple rounds of this to fine-tune aesthetic alignment.
And the best part? This was opinionated training.
They didn’t try to please everyone. No global aesthetics dataset. No “median preference” compromise.
They biased the model toward a very specific look — their own.
Because if you try to blend everyone’s preferences into one model, you just get a washed-out midpoint. Instead of strong minimalism or bold fashion or surreal edge, you get something that satisfies nobody.
So they overfit — on purpose. Not to a dataset, but to a taste.
Why This Works
This isn’t about scale. It’s about intent.
Almost every other open model is trained for generality. FLUX.1 was trained for style — the kind of style that survives compression, shows up in the skin texture, and controls the way light wraps around a shape.
The big shift here isn’t technical — it’s philosophical.
They didn’t ask: “Can it render hands?”
They asked: “Does it look right?”
And that’s why the results feel different.
How to Download and Set Up Flux.1 Krea for ComfyUI (Properly)
If you want to try this model inside ComfyUI, here’s how to set it up the right way — whether you’re using full FP16 or going low-VRAM with GGUF.
Which Diffusion Model to Use?
There are two versions of the main FLUX.1 model:
Important: you’ll need to agree to the Black Forest license on Hugging Face to download the full model.
If you want something even lighter — or just need faster load times — you can grab the official GGUF versions here on Hugging Face. These come in Q2 through Q8 formats depending on how much VRAM you’ve got. Lower Q = lower memory usage.
Once downloaded, drop the file into your ComfyUI directory here:
ComfyUI/models/diffusion_models/
Text Encoders for Flux.1 Krea
The model uses two different text encoders. You only need to download these once — if you’ve run other Flux workflows before, you probably already have them.
Save these into:
ComfyUI/models/text_encoders/
You’ll select both files in the DualCLIPLoader node later. clip_name1 is the T5 encoder, and clip_name2 is the CLIP-L file.
VAE for Flux.1 Krea
For the VAE, just use the one recommended in the official release:
Save it here:
ComfyUI/models/vae/
In your workflow, make sure it’s connected to the VAE node.
What About GGUF?
If you’re running on limited memory or want faster load times, GGUF is a great option. This lets you run FLUX.1 using UNetLoader GGUF instead of the standard Load Diffusion Model node.
Here’s what to do:
You may also need to adjust the virtual_vram_gb setting if you get memory errors — bumping it up usually fixes allocation issues.
Same thing applies for text encoders. If you’re using GGUF format encoders, switch over to DualCLIP Loader GGUF, bypass the default one, and connect outputs manually.
Don’t Forget TeaCache
If you want faster generation without changing steps or resolution, add Tea Cache to your workflow.
Here’s how I’ve set it up:
You can also experiment with MagCache if you’re looking for alternatives — both options work great, depending on hardware.
Two samplers instead of one
Here’s how it works:
The first sampler runs for 15 steps. It’s only job? Noise.
It builds the structure — the initial layout, shapes, rough lighting.
Then, the output from that gets passed to a second sampler, which runs from step 15 to 30.
That second pass focuses purely on detail — textures, reflections, small lighting tweaks. It’s where the image sharpens up.
And yeah, it worked better than I expected.
The result is visibly sharper. It cleans up that soft AI haze and brings back real contrast and depth.
What Happens with 8-Step LoRA?
I pushed it further and tried an 8-step generation using Flux1 Turbo Alpha LoRA.
Here’s what I did:
– First sampler: 4 steps
– Second sampler: 8 steps
But yeah… that didn’t work.
The result was too noisy, too soft. Even with LoRA, it wasn’t usable. So I just turned it off and went back to 20 steps.
Lesson: FLUX.1 Krea can go fast, but there’s a limit. Below 8 steps, things start to break — even with LoRA in play.
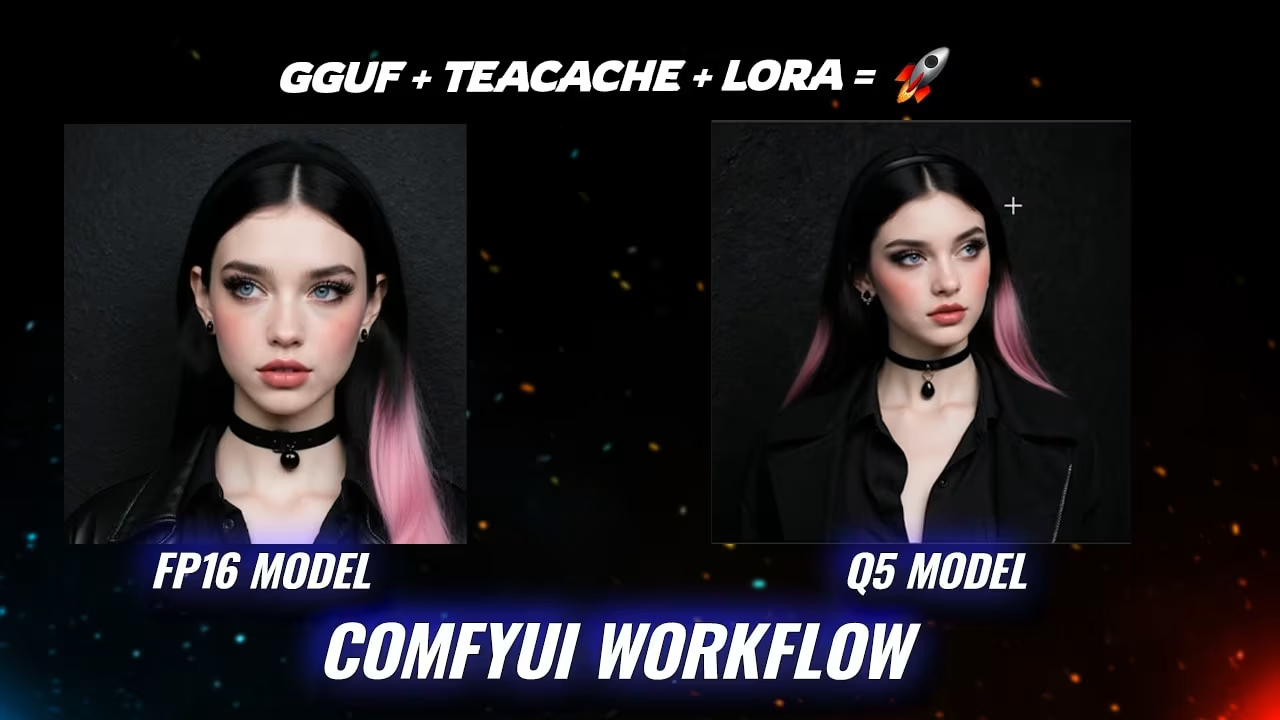
FP16 vs Q5 GGUF: How Much Do You Lose?
Next, I wanted to know how much quality you actually lose with quantized GGUF models — specifically Q5.
So I generated the same image twice. Once using the full 22GB FP16 .safetensors model, and once with the Q5 GGUF file.
Surprisingly? They were almost identical.
Sharpness, color, depth — all very close. You’d really have to pixel-peep to notice a difference. So if you’re on low VRAM and wondering whether flux krea gguf is viable — it absolutely is.
Q5 gives you almost the same quality as FP16, but with a much smaller memory footprint.
Running at HD and 4K: What Works (and What Doesn’t)
Last thing I checked was resolution.
1920 × 1080 (Full HD) — no issues.
Clean render, nice lighting, all the details held up. No weird glitches.
But when I tried pushing to 3840 × 2160 (4K), it broke.
The model failed to render. Most likely a limit of the underlying flux dev architecture. Not a bug, just a ceiling.
So yeah — for now, stick to HD. You’ll get amazing results without pushing the model past what it was trained to handle.


I tried multiple times but no mail or workflow link. please fix this issue. thanks
bro check in spam folder you must got the email there. verify the account first once its verified then everytime you enter your email to download you will get workflow downloaded in download folder. its as simple at is.
stupid e-mail registration
thanks :) but we will manage
Using this workflow, the generated images were distorted and had strange colors. Do you know what might be happening?