
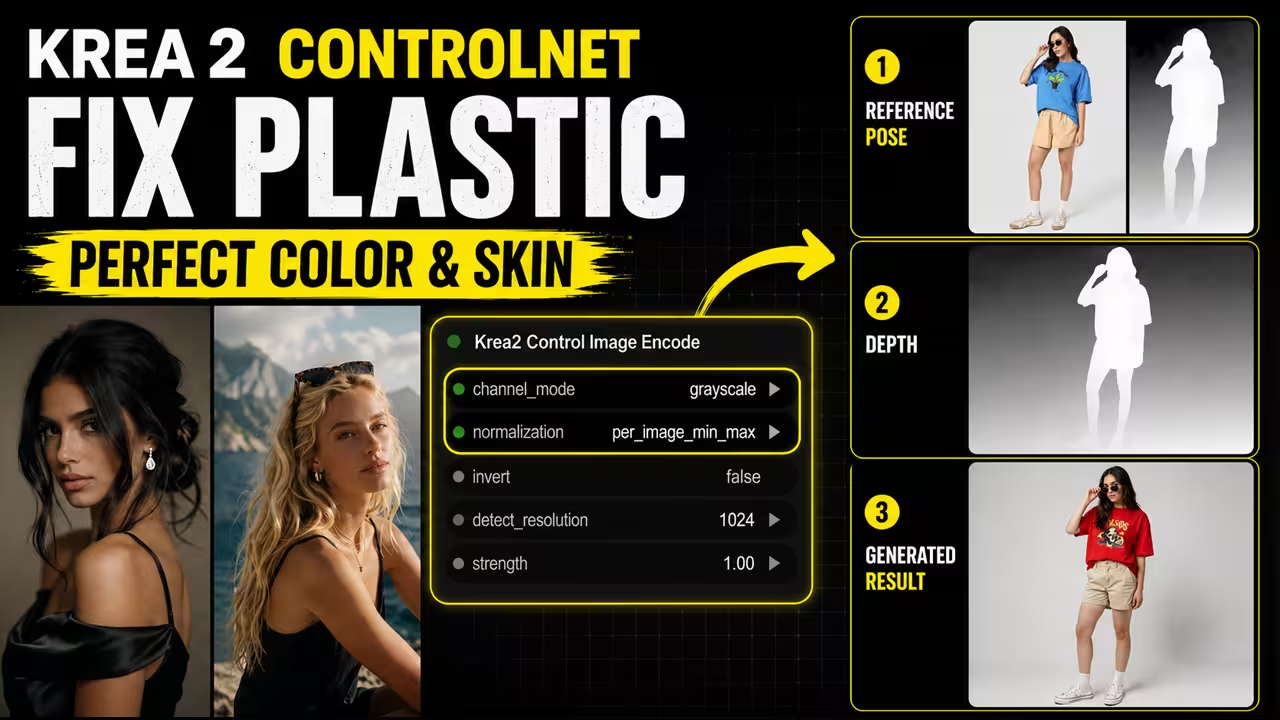
The new Krea 2 ControlNet is incredibly powerful, but it is currently missing from the ComfyUI Manager. To run it, you must install it manually and adjust a few hidden settings to prevent oversaturated colors. In this step-by-step guide, I will show you how to manually install the custom node, wire the workflow to protect your VRAM, and use the “Grayscale” trick to generate highly realistic skin textures
What is Krea 2 ControlNet and Why You Need It
- Direct Answer: Krea 2 ControlNet is a custom ComfyUI workflow that allows you to copy the exact pose and composition of a reference image and apply it to your Krea 2 generations.
- Simplest Step-by-Step Action: Install the custom
ComfyUI-Krea2-ControlNetfolder manually, download the Depth Control LoRA, and run your pose reference image through a grayscale encoder.
Standard Krea 2 prompts struggle to match specific postures. If you try to generate a character performing an action, the AI often guesses the posture incorrectly. Krea 2 ControlNet solves this by locking onto a depth map from your reference image. This ensures your final character stands, sits, or moves exactly like your reference subject.
Step 1: Manually Installing the Custom Node
- Direct Answer: Because the Krea 2 ControlNet custom node is missing from the ComfyUI Manager search list, you must install it manually using your terminal.
- Simplest Step-by-Step Action: Copy the official GitHub link, open your command prompt inside the
comfyui/custom_nodesfolder, typegit clone [link], and restart your ComfyUI workspace.
git clone https://github.com/[official-developer-link]/ComfyUI-Krea2-ControlNet
Once you run this command, your terminal will create a new folder named ComfyUI-Krea2-ControlNet. Close your command prompt and restart ComfyUI to load the new nodes onto your canvas.
Step 2: Downloading the Krea 2 ControlNet Models
- Direct Answer: You must download the Krea 2 Depth Control LoRA and the Depth Anything V3 model to process your postures.
- Simplest Step-by-Step Action: Save the Krea 2 Depth Control LoRA in your
lorasfolder, and load the lightweight Depth Anything model to prevent memory issues.
Grab the Krea 2 Depth Control LoRA First, download the official Krea 2 Depth Control LoRA file. Save this file directly inside your comfyui/models/loras folder.
Save VRAM with Depth Anything V3 Small Next, you need a depth estimator model. I highly suggest downloading the Depth Anything V3 Small model instead of the large version. Using the small version saves a massive amount of VRAM on local GPUs, which prevents out-of-memory errors while processing the depth map.
Step 3: Connecting Your ComfyUI Nodes
- Direct Answer: To build the workflow, you must connect the Krea2 Control LoRA Loader to a Control Apply node and pipe your reference image through a Control Image Encoder.
- Simplest Step-by-Step Action: Wire your reference image into
Krea2 Control Image Encode, connect that toKrea2 Control Apply, and link the output directly to your KSampler.
Double-click your ComfyUI canvas and add these three specific nodes:
- Krea2 Control LoRA Loader: Select your downloaded Krea 2 Depth Control LoRA file here.
- Krea2 Control Image Encode: Connect this node to your
Depth Anything V3 Smallloader. - Krea2 Control Apply: Connect your reference image to the
Krea2 Control Image Encodeinput.
Finally, route the output of the Krea2 Control Apply node directly into your main KSampler.
How to Fix Duplicate Characters and Plastic Skin
- Direct Answer: You can fix blurry details, duplicate character glitches, and plastic skin by changing your Control Image Encoder channel mode from RGB to Grayscale.
- Simplest Step-by-Step Action: Open your
Krea2 Control Image Encodenode, switch the channel mode to Grayscale, and set the normalization method to Per Image Min-Max.
Swap RGB Mode to Grayscale By default, the node uses RGB mode. RGB mode carries the color details of your reference image into the generator, which often causes color bleeding, oversaturated faces, and duplicate character glitches. Swapping the channel mode to Grayscale removes the color information. This forces Krea 2 to focus strictly on depth, pose, and composition, resulting in highly realistic, non-plastic skin.
Use Per Image Min-Max Normalization For the best results, set your normalization method to Per Image Min-Max. This setup provides much cleaner depth outlines. It also improves background separation, making your final subject pop naturally.
Automating Pose Prompts with Gemma 4
- Direct Answer: To prevent blurry posture transfers, you should use Gemma 4 connected to a TextGenerate node to automatically rewrite your prompts.
- Simplest Step-by-Step Action: Add a
TextGeneratenode, selectGemma 4, write your basic posture instructions, and pipe the output to your sampler.
If you write a simple, manual prompt like “A man singing a song,” Krea 2 might generate a blurry, artificial background. To fix this, connect Gemma 4 to a TextGenerate node. In your instructions, tell Gemma 4 to keep the exact composition of your reference image, but replace the subject. Gemma 4 will automatically generate a highly detailed prompt that Krea 2’s text encoder can easily read, resulting in a crisp, professionally composed image

