
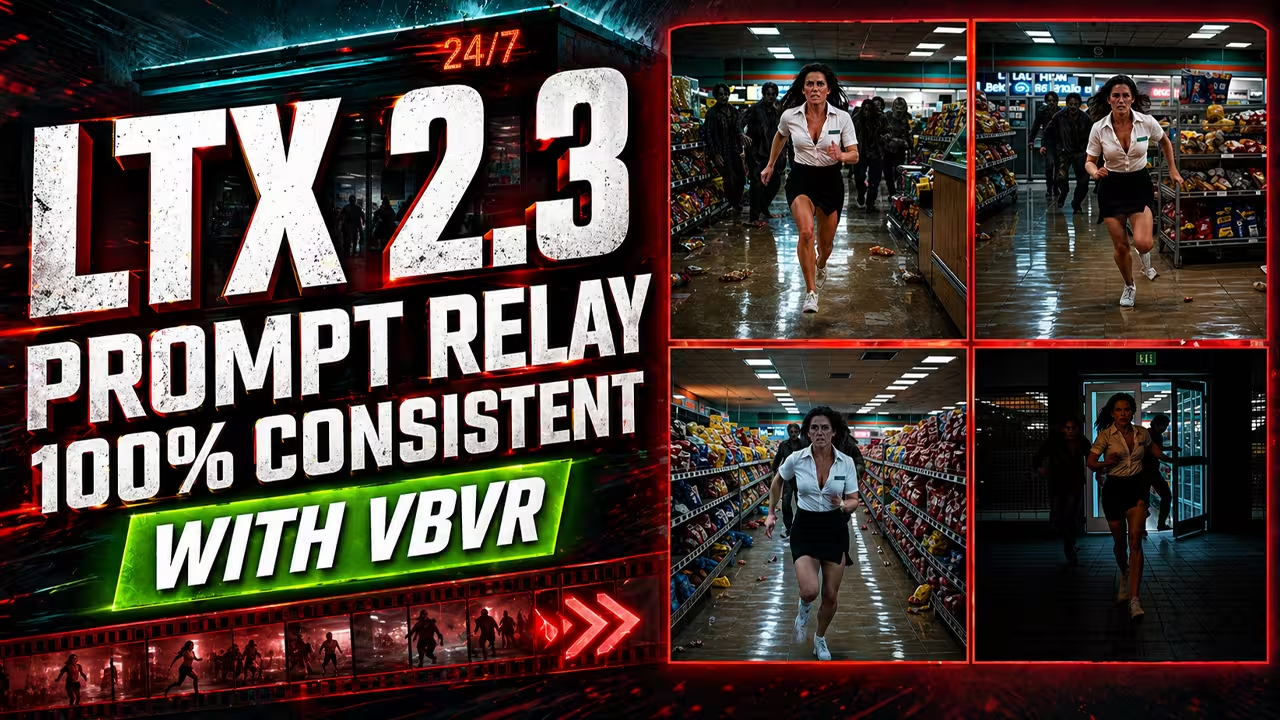
Standard text prompts ruin your LTX 2.3 videos. You write a long instruction, the camera angle shifts, and the AI instantly forgets your character. The system drops your actor into a completely random room.
We fix this scene drift completely using the Prompt Relay workflow inside ComfyUI. This exact method gives us absolute timeline control and keeps your environments perfectly consistent.
You must install specific files before you start. If you skip this step, your software fails and shows an error. I use this exact installation checklist for my own setup:
Files You Need Before Running This Workflow
Before you run this workflow, install the correct model files. If you skip this step, ComfyUI can show missing model errors, red nodes, or fail during generation.
For the main LTX 2.3 setup, download the LTX 2.3 base model and place it inside:
ComfyUI/models/checkpoints/
This is the main video model used to generate the base footage. The official Lightricks page lists ltx-2.3-22b-dev.safetensors as the LTX 2.3 dev model file.
Next, download the Gemma 3 12B text encoder and place it inside:
ComfyUI/models/text_encoders/
This is required so LTX 2.3 can understand your prompts correctly.
For decoding the video, download the LTX 2.3 video VAE and place it inside:
ComfyUI/models/vae/
Kijai’s LTX2.3 Comfy repository lists LTX23_video_vae_bf16.safetensors as a video VAE file.
For audio generation or audio latent handling, download the LTX 2.3 audio VAE and place it inside:
ComfyUI/models/vae/
Kijai’s repository also lists LTX23_audio_vae_bf16.safetensors as the audio VAE file.
For the upscale stages, download the LTX 2.3 spatial upscaler and place it inside:
ComfyUI/models/latent_upscale_models/
This file is used when you enable the 2X and 4X upscale passes.
For faster generation, download the LTX 2.3 distilled LoRA and place it inside:
ComfyUI/models/loras/
The official Lightricks page lists ltx-2.3-22b-distilled-lora-384.safetensors as a LoRA file for LTX 2.3.
For better action following and movement logic, download the LTX 2.3 VBVR LoRA and place it inside:
ComfyUI/models/loras/
Use this wording in your article: VBVR helps the model follow movement, spatial relationships, and action logic more reliably. The public LiconStudio page describes it as a LoRA fine-tuned for LTX 2.3 on the VBVR video-reasoning dataset.
For the upscale detail pass, download the LTX 2 IC-LoRA Detailer and place it inside:
ComfyUI/models/loras/
This is optional, but I use it in the 2X and 4X stages to improve fine detail. The Lightricks page describes it as a video detailer IC-LoRA designed to enhance fine details and textures.
If you want to use the EditAnything or inpainting part of the workflow, download the LTX 2.3 EditAnything LoRA and place it inside:
ComfyUI/models/loras/
This file is optional. You only need it if you enable the edit or inpainting section of the workflow.
There is also an optional GGUF path. If you want a lower-VRAM GGUF setup, install ComfyUI-GGUF and use a GGUF model such as the LTX 2.3 GGUF model. ComfyUI-GGUF says GGUF model files should be placed in ComfyUI/models/unet/.
Custom Nodes You Need
Install ComfyUI-PromptRelay by Kijai. This is the main custom node that adds Prompt Relay support. Prompt Relay lets you split one video into multiple prompt-controlled timeline chunks.
We also use a few optional files to improve the final result. Use this reference table to see exactly when you need to install them
| Optional File | When You Need To Use It |
|---|---|
| 2X and 4X IC Detailer LoRAs | You want to increase your video resolution safely during the upscaling passes. |
| ID-LoRA Custom Node & LTXVReferenceAudio | You want to generate talking-head videos with accurate lip-syncing. |
Global vs. Local Prompts
We split your instructions into two separate layers to maintain perfect consistency. Prompt Relay processes your video through a Global Prompt and a Local Prompt.
You use the Global Prompt to lock in your character, the environment, the camera style, and the lighting. You use Local Prompts to control exactly what happens step-by-step in your timeline.
Use this reference table to understand exactly how to separate your instructions:
| Prompt Layer | Core Function | Example Prompt |
|---|---|---|
| Global Prompt | Defines the core visual identity you want to keep permanent. | “A cinematic photorealistic high-energy boxing training sequence inside a dark indoor gym.” |
| Local Prompts | Controls the exact step-by-step actions in the timeline. | “The same muscular male boxer punches the heavy bag.” |
You must explicitly use continuity words to prevent your video from losing stability. Don’t let the AI guess. I constantly repeat literal phrases like “same pop star,” “same face,” or “same stage” inside my local prompt chunks. This reminds the software exactly who we are generating during camera movements or action changes. Your background and character identity remain perfectly intact.
Strict Rules for Prompt Writing
Writing prompts for LTX 2.3 requires a specific structure. I use these exact methods to control the system and guarantee a successful generation:
- The Single-Action Rule: Write one clear action combined with exact scene instructions. You must keep the same main subject in every chunk so the scene doesn’t reset.
- The Four-Part Sequence: I build my local chunks using a safe, four-step structure. Start with an action and a clear camera direction. Add a continuation. Introduce a stronger visual change. Finish with a final action or an ending pose.
- Physical Camera Verbs: Use literal, physical verbs for your camera movement. Type words like “pushes in,” “tracks left,” or “pulls back.” Avoid unstable commands like a spinning camera or random zooms, and don’t put too many cuts into one single chunk.
- Perspective Matching: You must match the exact camera angle of your reference image to your source video. This guarantees the best blending results.
Timeline Control in Simple Mode
We control our exact timeline using Simple Mode. You use the pipe keyboard symbol (|) to separate your individual actions. Don’t write one confusing paragraph. You split your sequence into clean, separate parts like this: Action 1 | Action 2 | Action 3.
Prompt Relay gives us two distinct ways to control when these actions happen.
If you leave the segment_lengths box completely blank, the software automatically divides your total video duration evenly across all your prompt chunks. I use this specific auto-timing method for fast-action scenes. It creates quick cuts without forcing you to calculate exact frame numbers.
If you want absolute control, you type manual frame numbers directly into the segment_lengths box. You just need to follow one strict mathematical rule. Your number of text chunks must exactly match your number of timing values. If you write five text chunks, you must type exactly five numerical values. If those numbers don’t match, your workflow fails and shows an error.
LTX video frame counts follow a strict formula: 8n + 1. A 15-second video running at 24 frames per second requires exactly 361 total frames. Your manual segment lengths must add up to this exact total. You write it like this: 72, 72, 72, 72, 73.
The Epsilon Setting
Look at the Epsilon setting inside your Prompt Relay node. This number controls the transition sensitivity between your different prompt segments.
I follow a strict guide for these values. Use this reference table for your own setup:
| Epsilon Value | When You Should Use It |
|---|---|
| 0.001 (Default) | You want smooth, natural blending between your scenes. |
| 0.003 | You want the action changes to feel stronger and more direct. |
| 0.005 (Maximum Limit) | Treat this as your absolute maximum. Anything higher makes the transitions too aggressive, and the system stops blending your frames properly. |
My Safe Upscaling Strategy
People constantly make the mistake of running every rendering stage at the exact same time. Upscaling a bad generation simply gives you a sharper bad generation. I use a staged pipeline to save hours of rendering time and prevent color distortion.
Here is my exact step-by-step upscaling process:
- Run the Main Stage First: Keep your upscale groups disabled. Run the Main stage only. Look at your preview and verify that your character, your timing, and your camera movements look perfectly correct.
- Enable the 2X Upscale: Turn on the 2X group if your Main video looks successful. I set my 2X detail LoRA strength exactly to 0.65. This provides crisp enhancement without destroying your original scene.
- Use 4X Upscale With Extreme Caution: Keep the 4X stage completely disabled unless your base resolution is very small, like 320 by 320 or 384 by 384. If you run a 4X upscale on a standard 512 by 512 base, your final output hits 2048 by 2048. This massive size causes severe color shifts, over-sharpens the image, and ruins your characters’ faces. If you absolutely must use 4X on a small video, turn the detail LoRA strength down to 0.35.
Image-to-Video vs. Text-to-Video
We can dictate exactly how we start our video generation. You control this using a simple bypass_i2v switch inside your workflow. This single toggle determines whether we build our scene from a reference picture or from pure text.
I use this specific reference table to manage my own starting points:
bypass_i2v Setting | Operating Mode | What the System Does |
|---|---|---|
| False | Image-to-Video | The software reads your specific reference image. This keeps your visual style, your main subject, and your lighting perfectly stable from the very first frame. |
| True | Text-to-Video | The system ignores all reference images completely. We generate the entire video from scratch using only your global and local text prompts. |
You decide your exact starting method. Set your switch, and we move directly to the next step.