


Now You do not have to use the old VAE file anymore.
I found a new VAE file for Flux and Z-Image Turbo. It is called UltraFlux VAE.
If you use Flux or Z-Image in ComfyUI, you know the problem. The images look good, but sometimes they look a little bit soft. The skin texture is not clear. The small details like hair or fabric look smooth instead of sharp.
Why Your Images Look Blurry in ComfyUI
First, let us understand what is happening here. You might be asking yourself what a VAE actually is.
You can think of it like a translator.
Your AI model speaks in computer noise. It creates a complex map of data that we cannot see with our eyes. The VAE is the translator that turns that noise into the final pixels you see on your screen.
The standard VAE that comes with Flux is good, but it is a bit safe. It smooths things out too much. It misses the tiny details because it wants to keep the image clean.
UltraFlux VAE is different. It was trained specifically on 4K images. It knows how to translate those tiny details like the eyelashes, the skin pores, and the texture of a sweater without making them blurry.
How I Found the UltraFlux VAE File
I searched on Hugging Face to find this and The file is hosted by a username is Owen777.
When I tested it, I found it works perfectly for both standard Flux workflows and the Z-Image Turbo workflows.
Many users who tried this have shared their experience online. They said they see increased detail in Z-Images when they use the New UltraFlux VAE.
How to Install UltraFlux VAE in ComfyUI
Once you have the file, you need to put it in the right place.
I am doing this on my PC right now, and you can follow along.
First, you have to open your ComfyUI folder. Then go to the models folder. Inside there, find the folder named VAE.
You can paste the file right here.
I like to rename mine to something simple like UltraFlux_VAE.safetensors. This helps me find it easily later when I am working in ComfyUI.
Setting Up the Workflow
Now you have to open your standard Flux or Z-Image ComfyUI workflow.
You do not need to build anything new. You just need to look for the Load VAE node.
If you are using a standard checkpoint loader, you might need to add a separate Load VAE node.
In the Load VAE node, click the list and select the new UltraFlux file. That is it. You are ready to generate.
Comparing the Results
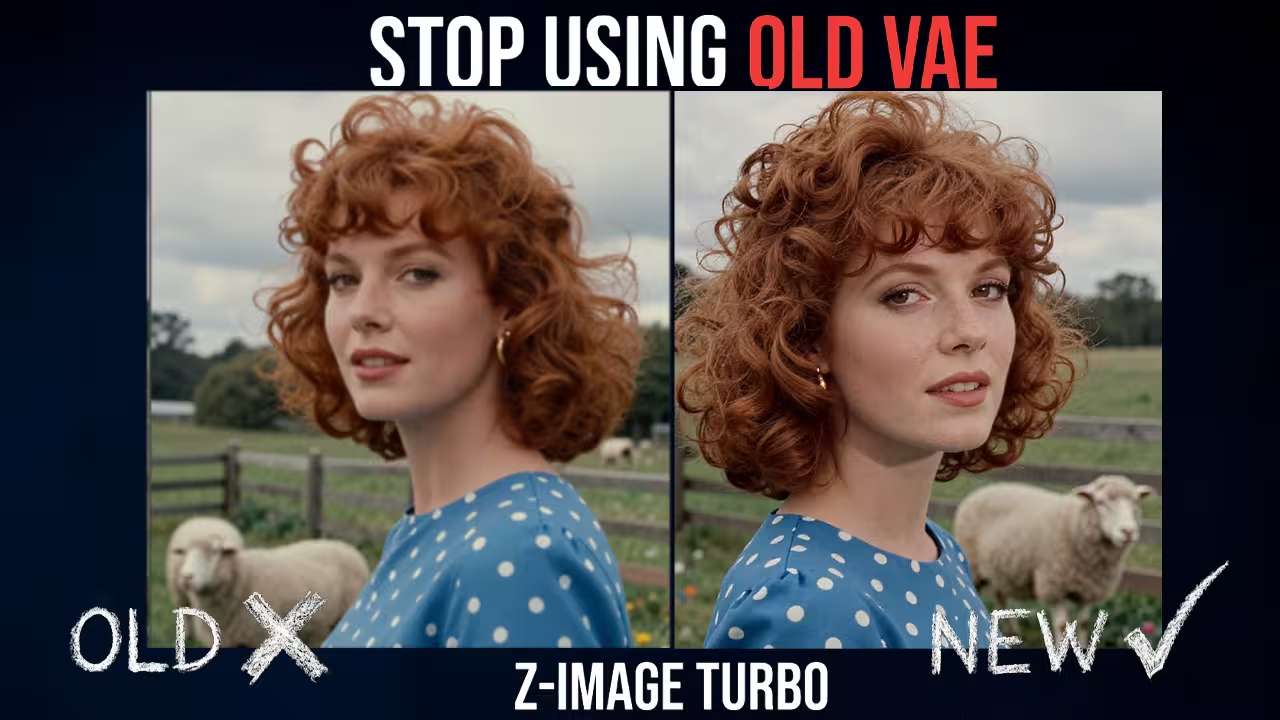
I generated an example first with the old VAE file to show you the difference.
My prompt describes a vibrant 1960s close-up portrait of a woman in a garden. I asked for curly red hair, gold earrings, and a polka dot dress.
With the normal VAE, the result looks good, but the details on the iPhone in her hand looked blurry and soft.
Then I disconnected the preview node and added a new one so I could compare them side by side. I did not change the seed. I did not change the model. I just changed the VAE file.
When I hit generate with UltraFlux VAE, the difference was clear.
The image became sharp. The details on the phone and the texture of the skin popped out. It looked much better than the standard version.
Why This Matters for Z-Image Turbo
This is very important if you use Z-Image Turbo.
We use Z-Image because it is fast. You get images in just a few steps. But sometimes that speed means the quality is a little bit soft.
By using UltraFlux VAE, you fix that softness instantly. You get the speed of Z-Image Turbo but with the sharp quality of a high-end render.
It is a simple trick, but it improves your quality instantly.
File You Need To Download
You can get the file from the link below.
- UltraFlux VAE: Download from Hugging Face
I hope this helps you get better images. I am using this for all my realistic generations now.